
1. Introduction
1.1. What is WIX?
WIX is a website builder, an easy-to-use tool that allows users to rapidly create an online presence via a drag-and-drop interface, with no coding knowledge required. A valid email address is the only requirement to get started with WIX's web hosting.
1.2. What is PaidBy?
PaidBy connects your business to the United Kingdom's open banking network that allows your customers to instantly pay directly from their bank accounts. Open banking payments are payments that are made directly by bank transfer from account to account. Using the latest banking regulatory initiatives across the world, new powerful tools make it possible for customers to pay directly from their bank account conveniently, intuitively, and safely. Instead of paying via the tedious process of entering card details and then authenticating, customers simply select their local bank from a drop-down list, login, and agree to pay the set amount.
⚠️ This service is only available to companies registered in the United Kingdom.
ℹ️ Whist an effort is made to keep all of the screenshots included in this guide as up to date as possible, this is a new system, and as such, is subject to constant change. Therefore, the screenshots included in this manual may contain small variations to the actual screens.
2. Overall process
The process may be summarised by means of the following schematic:
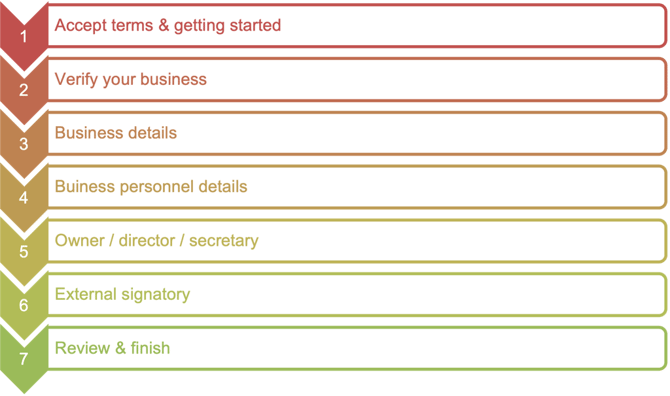
Figure 1: Overall flow
3. The process
With PaidBy it is possible to accept bank payments, cheaper and faster than using Mastercard or Visa cards.
PaidBy connects a business to accept payments from the United Kingdom’s largest banks, directly from customers’ accounts to a merchant.
The advantages of using PaidBy:
- It is more secure than using cards.
- Money goes into a merchant bank account, instantly.
- It is much easier to use than cards.
3.1. Accept terms & get started
To register, access the following link: PaidBy Bank signup
When the above URL is accessed, a screen similar to the following (refer to Figure 2) will be loaded.

Figure 2: Start page
It is necessary to confirm that the fees and terms of services have been read and agreed upon and that the business does not fall into the category of restricted businesses.
By placing a checkmark in the relevant checkbox widget, the fees and terms of services have been read and agreed upon (refer to Figure 2).

Figure 3: Start page with checkmark placed
Having placed a checkmark in the agreement checkbox widget, click on the “Get Started” button in order to proceed (refer to Figure 3).
After clicking on the “Get Started” button, it is now time to add the details of the business.
3.2. Verify business
Having clicked on the “Get Started” button, the “Add your details” page (refer to Figure 4) is displayed where the details of the business can now be added.
PaidBy collects information about the business to better serve the business and help meet the requirements of its regulators. Furthermore, PaidBy collects data about the business in order to provide the customer with a commercial agreement and fees.
By proceeding with this application, the foregoing terms and fees are accepted.
Enter the company name or company’s registration number in the “Registered company name or number” textbox.
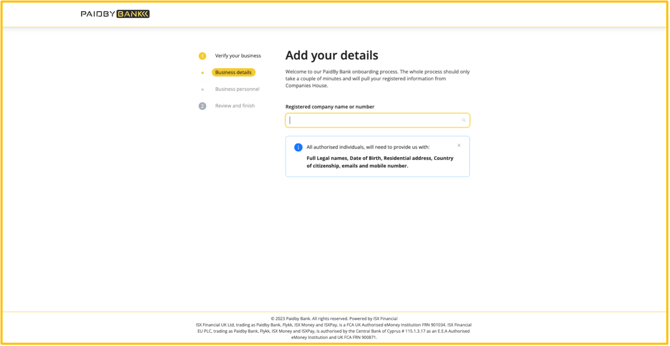
Figure 4: “Add your details” page
Upon entering the first few letters of the business name in the textbox, the system attempts to match the entered text to existing businesses from the Companies House database (refer to Figure 5).
ℹ️ Companies House is the executive agency of the British Government that maintains the register of companies, employs the company registrars, and is responsible for incorporating all forms of companies in the United Kingdom. It was formed in 1844 and its headquarters are located in Cardiff, Wales.
The system then lists all matching business names in the textbox, in an attempt to populate the field.
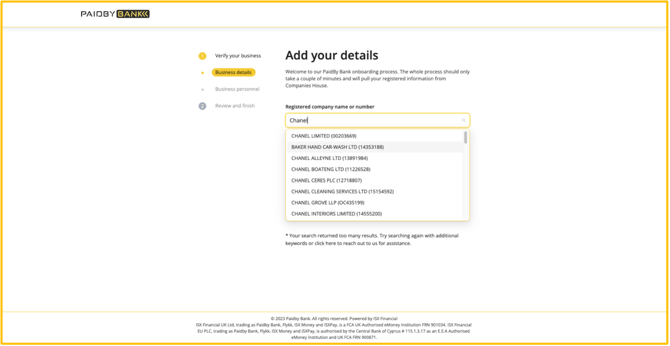
Figure 5: “Add your details” with “Registered company name or number” drop-down widget
Peruse the list and then click on the relevant business to select it (refer to Figure 6).
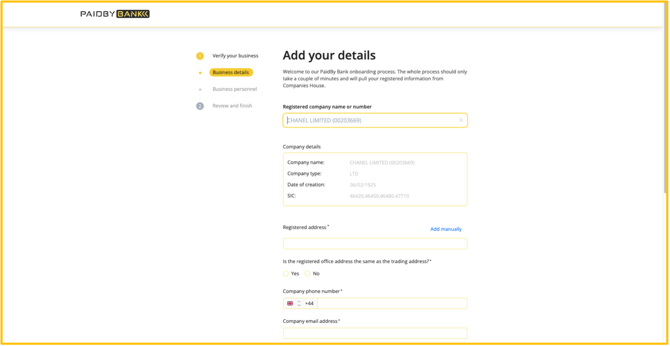
Figure 6: “Add your details” page
When a business is selected, one of the three scenarios listed below follows (refer to Figure 7, Figure 8, & Figure 9).
If an application for a business has already been submitted, a message similar to the one in Figure 7 will appear. In this case, please contact us on success@paidbybank.com.
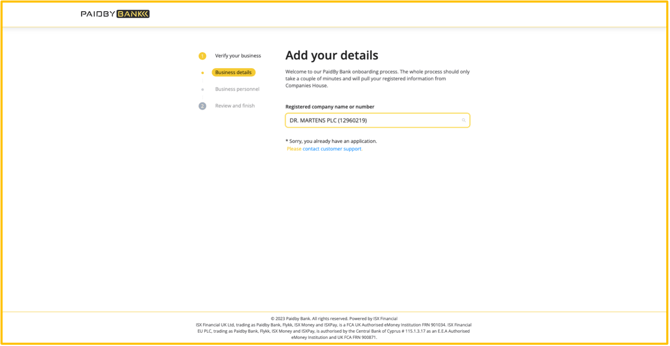
Figure 7: “Add your details” page – 1st scenario
If a selected company is owned or operated by another company, a message similar to the one in Figure 8 will appear. Please contact onboarding@isxfinancial.com with your request to apply for PaidBy.
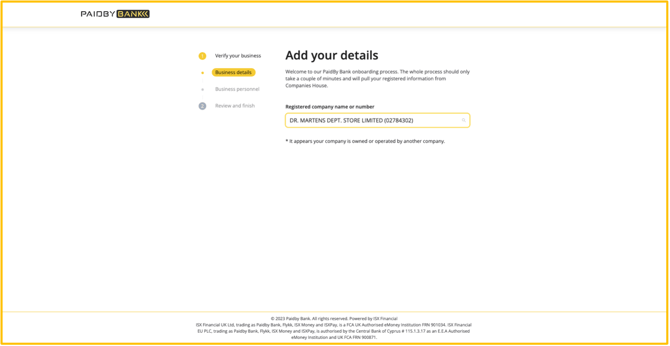
Figure 8: “Add your details” page – 2nd scenario
If the system accepts the selected business, it then returns a form in the “Add your details” page that is partially populated (refer to Figure 9).
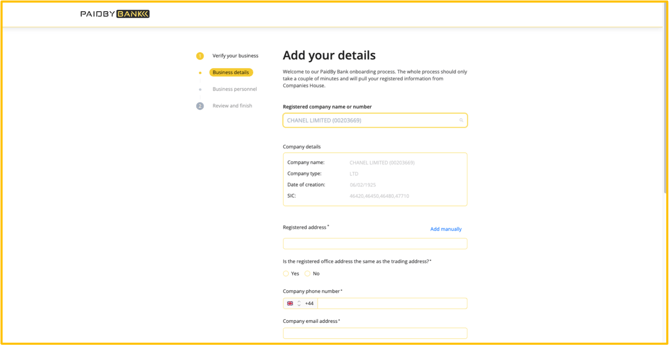
Figure 9: “Add your details” page – 3rd scenario
3.3. Business details
Begin by completing the “Registered address” field in the “Add your details” page (refer to Figure 9). Upon entering the first few letters of the registered address in the textbox, the system attempts to match the entered text to addresses from Google.
The system lists all matching street names in the textbox, in an attempt to populate the field (refer to Figure 10).
Peruse the list and then click on the relevant address to select it.
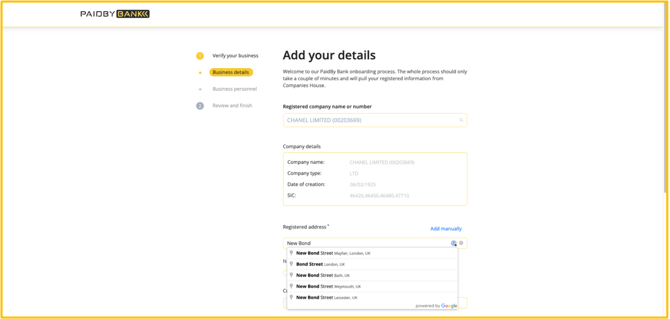
Figure 10: “Add your details” page with “Registered address” drop-down widget
When the relevant address has been clicked, a green tick will appear in the “Registered address” field (refer to Figure 11).
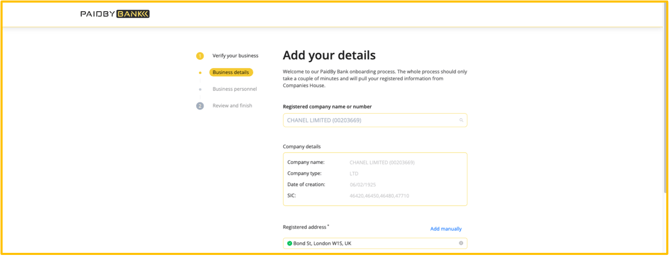
Figure 11: “Add your details” page with “Registered address” field accepted
Alternatively, click on the “Add manually” button to display all address-related fields.
The “Add your details” page should resemble the following series of figures:

Figure 12: “Add your details” page adding an address manually
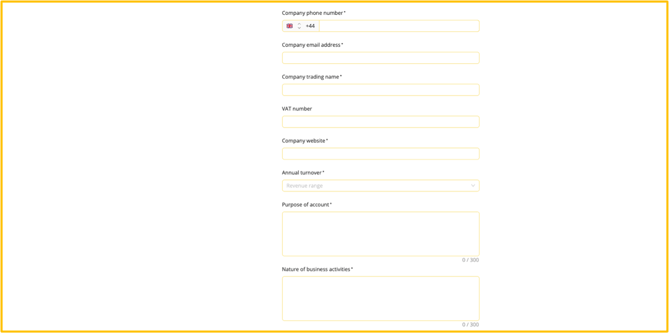
Figure 13 (a): “Add your details” page continued

Figure 13 (b): “Add your details” page continued
Complete all of the required fields.
ℹ️ The UK Standard Industrial Classification of economic activities, abbreviated as UK SIC or SIC, is a five-digit classification providing the framework for collecting and presenting a large range of statistical data according to economic activity. Companies House uses a condensed version of the full list of codes available from the Office of National Statistics, which is available here.
If the registered office address is the not the same as the trading address, click on the “No” option in the “Is the registered office address the same as the trading address?” field.
Clicking on the “No” option in the “Is the registered office address the same as the trading address?” field will reveal the “Trading postal code” textbox field (refer to Figure 14).
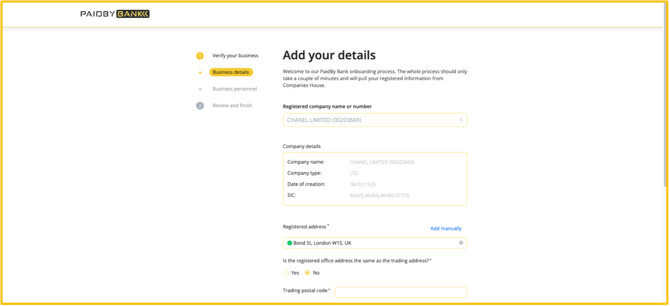
Figure 14: “Add your details” page where the registered office is not the same as the trading address
The system performs input validation as data is entered and if any input data is not deemed correct, the system will flag the relevant issue(s), as per the below:

Figure 15: “Add your details” page with a validation error
Having completed all of the required data on the “Add your details” page, click on the “Continue” button to proceed (refer to Figure 13).
ℹ️ The person whose email is entered in the “Contact email address” field will receive a summary email and once a company is successfully onboarded, this person will receive the PaidBy credentials.
3.4. Business personnel
Clicking on the “Continue” button of the “Add your details” page and assuming that all the required data has been entered correctly, the system will return with a list of owners, directors, and secretaries associated with the entered business in a page entitled “Business personnel details”.
As per the series of figures below, there may be directors or owners and secretaries.
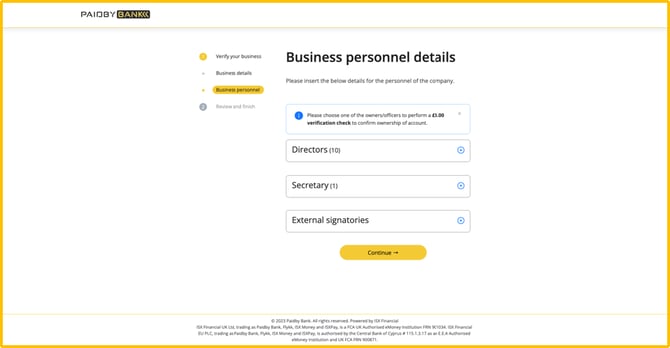
Figure 16: “Business personnel details” page with directors and secretary
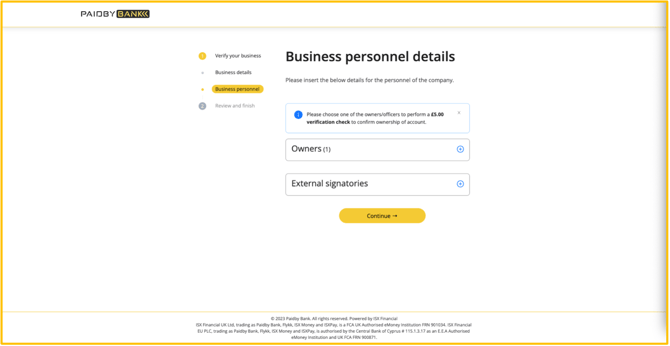
Figure 17: “Business personnel details” page with owners
Simply click on the ‘plus’ to expand the section and reveal the relevant personnel (refer to Figure 18 & Figure 19).
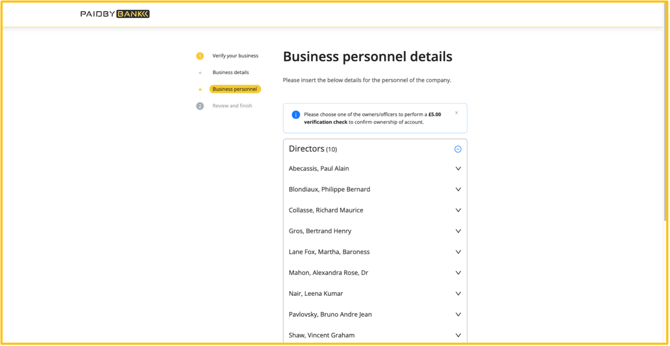
Figure 18: “Business personnel details” page with directors expanded
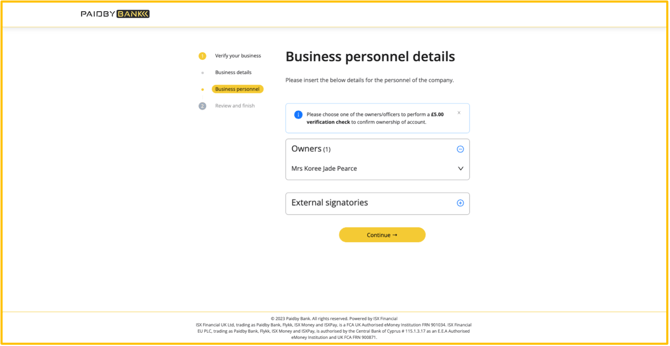
Figure 19: “Business personnel details” page with owners expanded
3.4.1. Owners/directors/secretary
The “Business personnel details” page allows users to view the personnel for the purposes of the registration process (refer to Figure 18 & Figure 19).
Simply click on the ‘down arrow’ to expand the section and reveal the details of the relevant personnel (refer to Figure 20 & Figure 21).
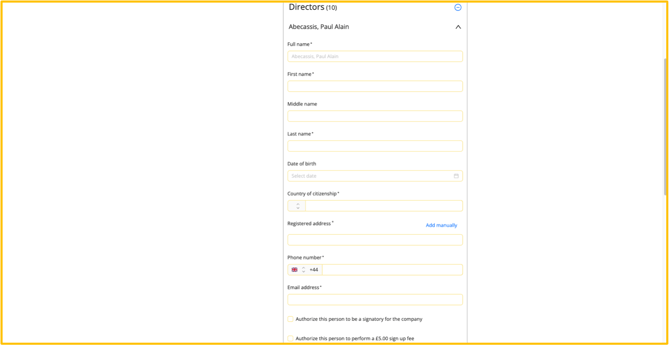
Figure 20: “Business personnel details” page with a personnel member selected

Figure 21: “Business personnel details” page with a personnel member selected continued
Complete all of the required fields.
Upon entering the first few letters in the “Registered address” textbox, the system attempts to match the entered text to addresses from Google.
The system lists all matching street names in the textbox, in an attempt to populate the field.
Peruse the list and then click on the relevant address to select it (refer to Figure 22).
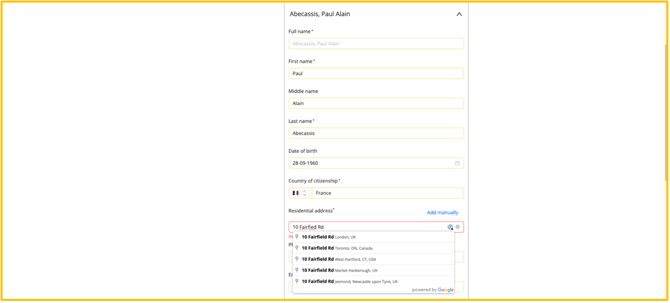
Figure 22: “Business personnel details” page with “Residential address” drop-down widget
When the relevant address has been clicked, a green tick will appear in the “Residential address” field (refer to Figure 23).

Figure 23: “Business personnel details” page with “Residential address” field accepted
Instead of the “Residential address” field, click on the “Add manually” button to display all address-related fields.
The “Business personnel details” page should resemble the following figure:
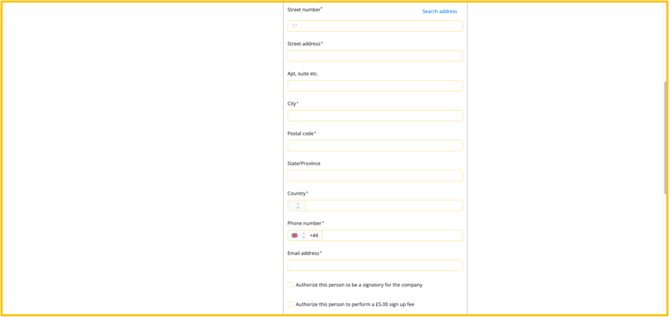
Figure 24: “Business personnel details” page with a personnel member selected
Repeat the above process for all of the relevant personnel listed on the “Business personnel details” page.
ℹ️ Under each owner you must select if they will be the account signatory for the eMoney account granted with ISX Financial UK for the purpose of money transfers. The signatory will be able to operate the account via Online Banking access.
One of the owners will be required to complete a £5.00 payment check to verify the bank details.
3.4.2. Owners/directors/secretary
The purpose of this option is to allow you to add an additional account signatory to your account. This can be left blank. If you wish to proceed with adding an additional signatory, click on the ‘plus’ to expand the “External signatories” section and reveal the relevant personnel (refer to Figure 25).
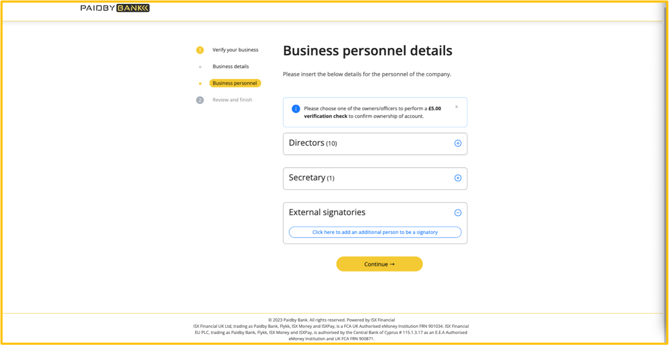
Figure 25: “Business personnel details” page adding a person as an external signatory
To add external signatories, click on the “Click here to add an additional person to be a signatory” (refer to Figure 26).
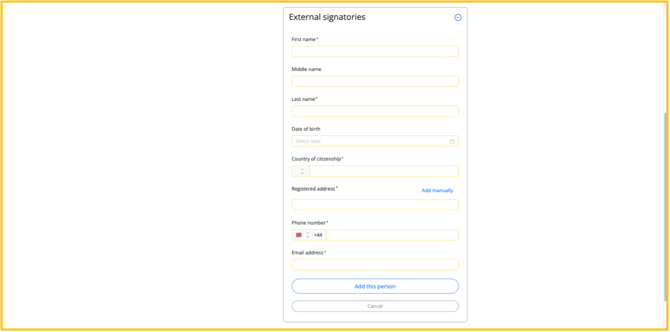
Figure 26: “Business personnel details” page adding a person as signatory continued
Complete all of the required fields (refer to Figure 27).
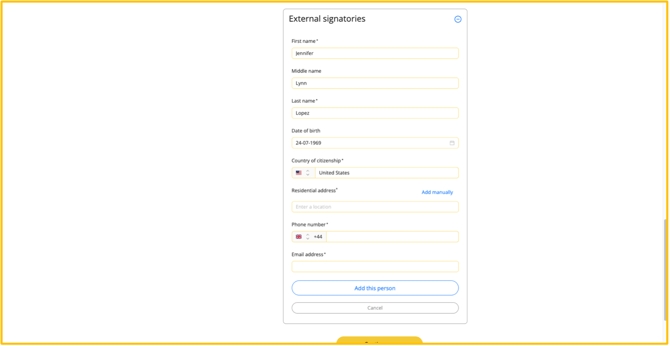
Figure 27: “Business personnel details” page adding a person as signatory continued
Upon entering the first few letters in the “Registered address” textbox, the system attempts to match the entered text to addresses from Google.
The system lists all matching street names in the textbox, in an attempt to populate the field.
Peruse the list and then click on the relevant address to select it (refer to Figure 28).

Figure 28: “Business personnel details” page adding a person as signatory with “Registered address” drop-down widget
When the relevant address has been clicked, a green tick will appear in the “Registered address” field (refer to Figure 29).

Figure 29: “Business personnel details” page adding a person as signatory with “Registered address” field accepted
Instead of the “Registered address” field, click on the “Add manually” button to display all address-related fields.
The “Business personnel details” page should resemble the following figure:
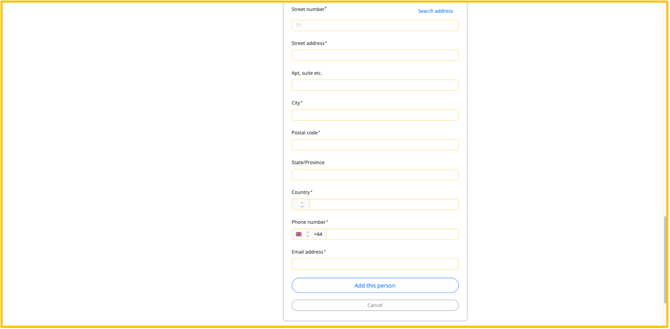
Figure 30: “Business personnel details” page adding a person as signatory continued
Complete all of the required fields.
Having completed all of the required data in the “External signatories” section, click on the “Add this person” button to save the external signatory.
Then, having completed all of the required data on the “Business personnel details” page, click on the “Continue” button to proceed (refer to Figure 31).
Figure 31: “Business personnel details” page continued
3.5. Review & finish
Having clicked on the “Continue” button of the “Business personnel details” page, the “Review and finish” page will be displayed to the user.
On the “Review and finish” page, a user has the opportunity to review the data entered so far.
In essence, a user may view and edit this data.
The “Review and finish” page is divided into two sections: the “Business details” section and the “Business personnel” section (refer to Figure 32).
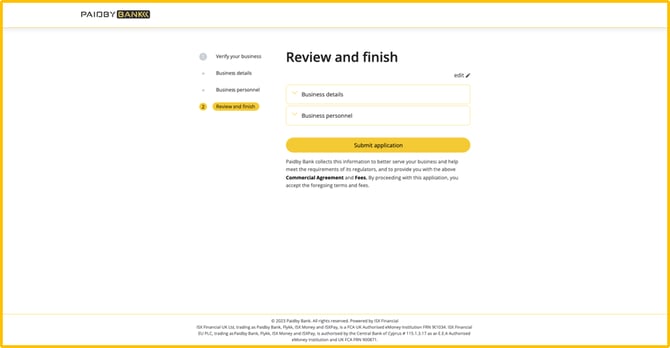
Figure 32: “Review and finish” page
Click on the relevant ‘down arrow’ to expand the “Business details” section and reveal the details of the relevant business (refer to Figure 33 & Figure 34).
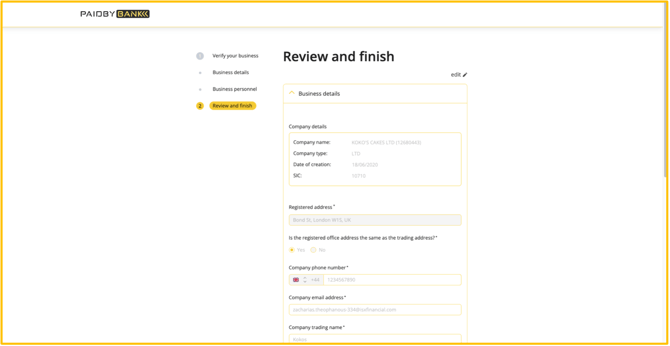
Figure 33: “Review and finish” page with “Business details” expanded
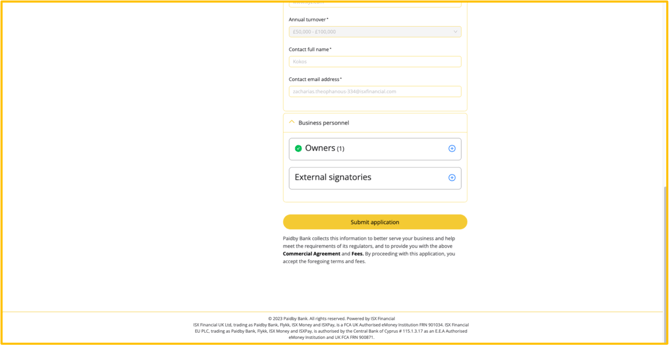 Figure 34: “Review and finish” page with “Business details” expanded continued
Review the data housed in the “Business details” section and click on the “edit” button to perform any necessary modifications (refer to Figure 33).
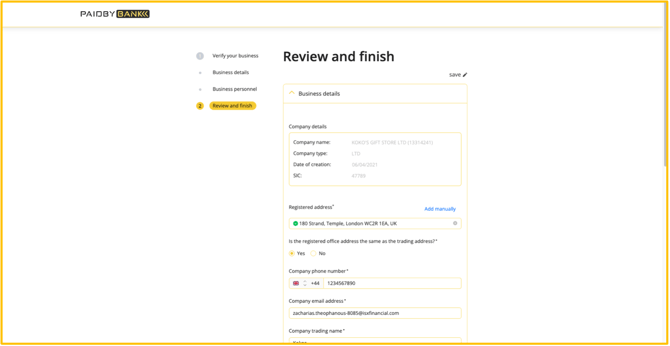
Figure 35: Editing the “Business details” within the “Review and finish” page
If any modifications have been performed in the data housed in the “Business details” section, click on the “save” button to retain those changes (refer to Figure 35).
Click on the relevant ‘down arrow’ to expand the “Business personnel” section and reveal the details of the relevant business personnel (refer to Figure 36).
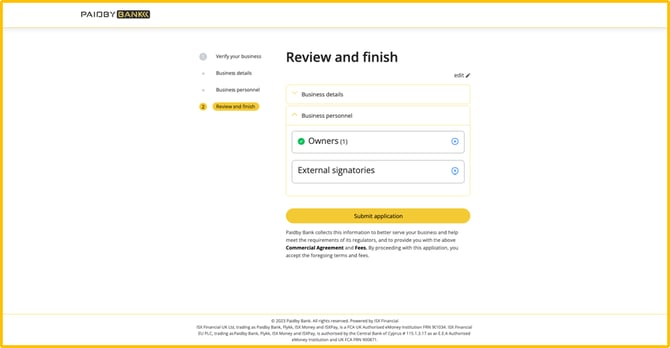
Figure 36: “Review and finish” page with “Business personnel” expanded
Then, click on the ‘plus’ to expand the section and reveal the relevant personnel (refer to Figure 37).
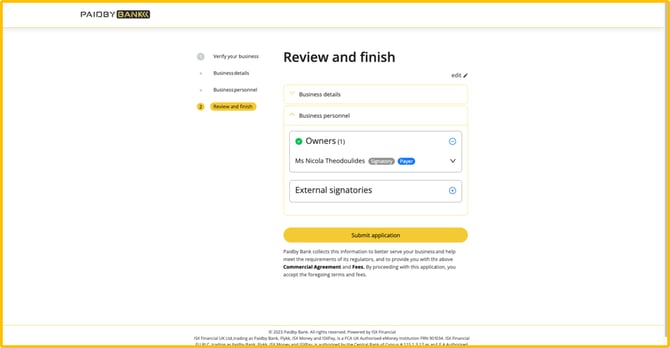
Figure 37: “Review and finish” page with “Owners” expanded
Then, click on the ‘down arrow’ to expand the section and reveal the details of the relevant personnel (refer to Figure 38 & Figure 39).
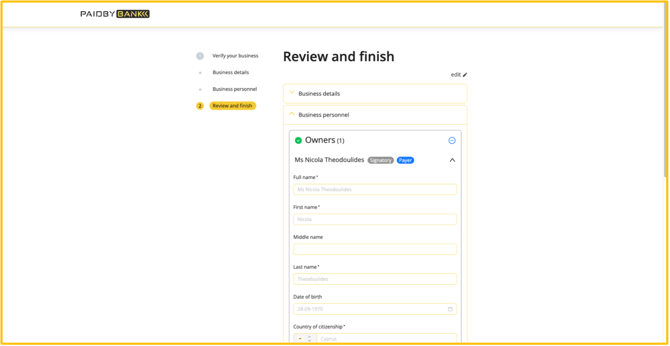
Figure 38: “Review and finish” page with an owner’s details expanded
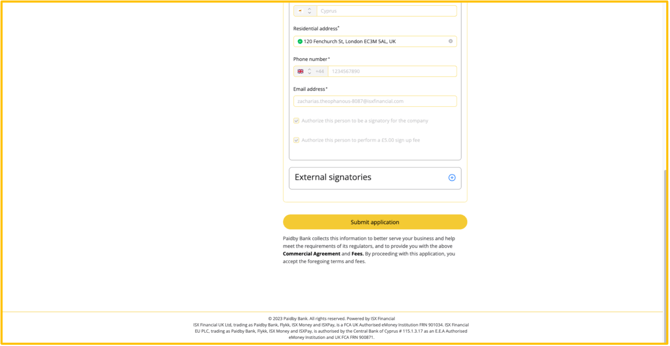
Figure 39: “Review and finish” page with an owner’s details expanded continued
Review the data housed in the “Business personnel” section and click on the “edit” button to perform any necessary modifications (refer to Figure 38).
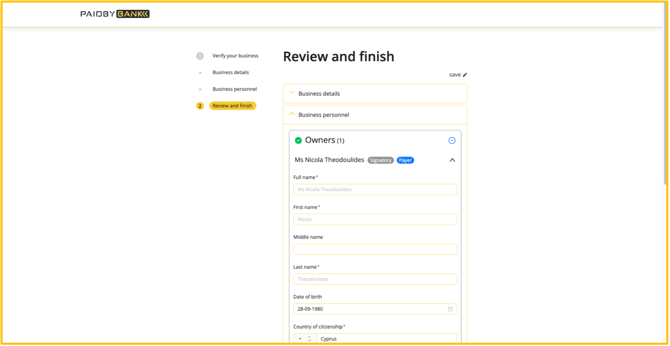
Figure 40: Editing the “Business personnel” within the “Review and finish” page
If any modifications have been performed in the data housed in the “Business details” section, click on the “save” button to retain those changes (refer to Figure 40).
Having reviewed the data on the “Review and finish” page, click on the “Submit application” button to continue.
Clicking on the “Submit application” button of the “Review and finish” page, a ‘processing’ page similar to the following figure will be displayed to the user.
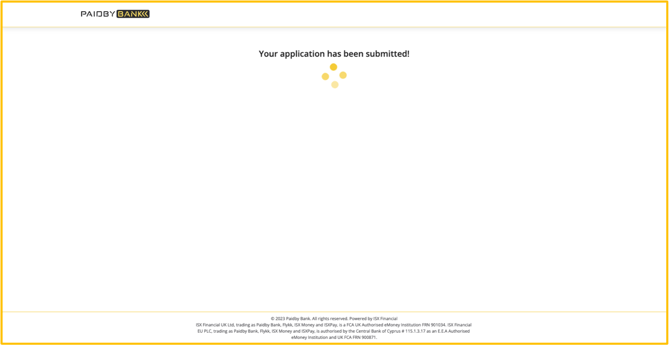
Figure 41: “Your application has been submitted” page
Once all of the required data has been submitted successfully, then the KYC status page will load (refer to Figure 42).
ℹ️ Know Your Customer (or Know Your Client), abbreviated as KYC, refers to guidelines and regulations in financial services that require professionals to verify the identity, suitability, and risks involved with maintaining a business relationship with a customer. The procedures fit within the broader scope of anti-money laundering (AML) and counter terrorism financing (CTF) regulations.
An email is then sent only to the payer and to all of the personnel listed in the “Business personnel details” page with failed electronic verification (EV). The email includes instructions for these persons to complete the KYC process.
KYC is required to be completed in order to proceed with the application.
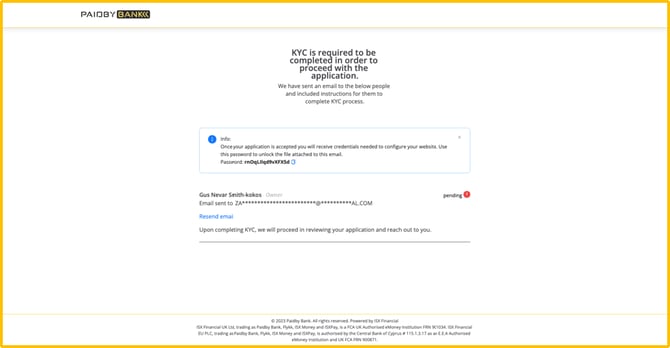
Figure 42: KYC status page
The KYC status page (refer to Figure 42) includes a password – this password must be saved/stored for use later on. If you do not save this password, you will not be able to retrieve it later. The password will be used to open the PaidBy credentials that are used to enable the service with WIX.
Once you have completed the application process, the contact person entered in the application form will receive an email with link to follow on the progress of personnel verification.
If you have any questions, please reach out to the ISX relationship management team at success@paidbybank.com.
3.6. Integrating PaidBy with WIX
After successful onboarding, the contact person entered in the application form will receive an email containing credentials.
On the WIX dashboard, go to “Settings” and select “Accept payments” (refer to Figure 43).
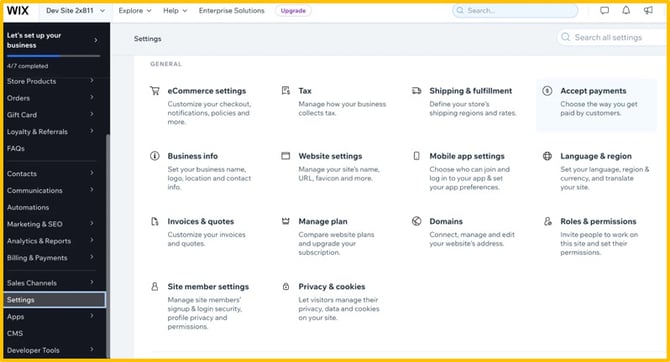
Figure 43: WIX Dashboard “Settings“
In the list of “Payment providers”, select "PaidBy Bank" (refer to Figure 44).
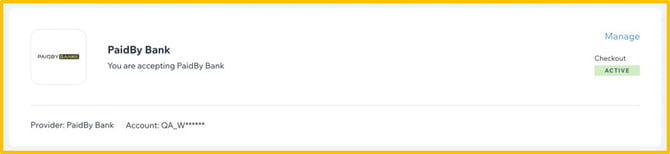
Figure 44: “Bank providers“ page
Enter the following credentials provided in the above-mentioned email in the “Manage PaidBy Bank“ page (refer to Figure 45).
- “API Client Name”.
- “Authorization Token”.
- “Merchant ID”.
- “Workflow”.
⚠️ Ensure the “Enable sandbox mode” checkbox remains unchecked (refer to Figure 45).
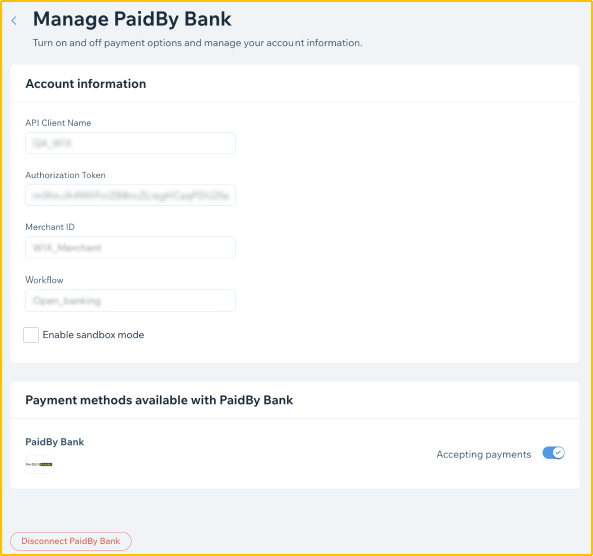
Figure 45: “Manage PaidBy Bank“ page